> For the complete documentation index, see [llms.txt](https://docs.lan.kokomocloud.com/llms.txt). Markdown versions of documentation pages are available by appending `.md` to page URLs; this page is available as [Markdown](https://docs.lan.kokomocloud.com/getting-started/logging-on.md).

# ログイン

## KOKOMO Cloudへのログイン <a href="#logging-in-to-kokomo-cloud" id="logging-in-to-kokomo-cloud"></a>

アカウントが作成・登録されたら、以下の手順でKOKOMO Cloudにログインできます。

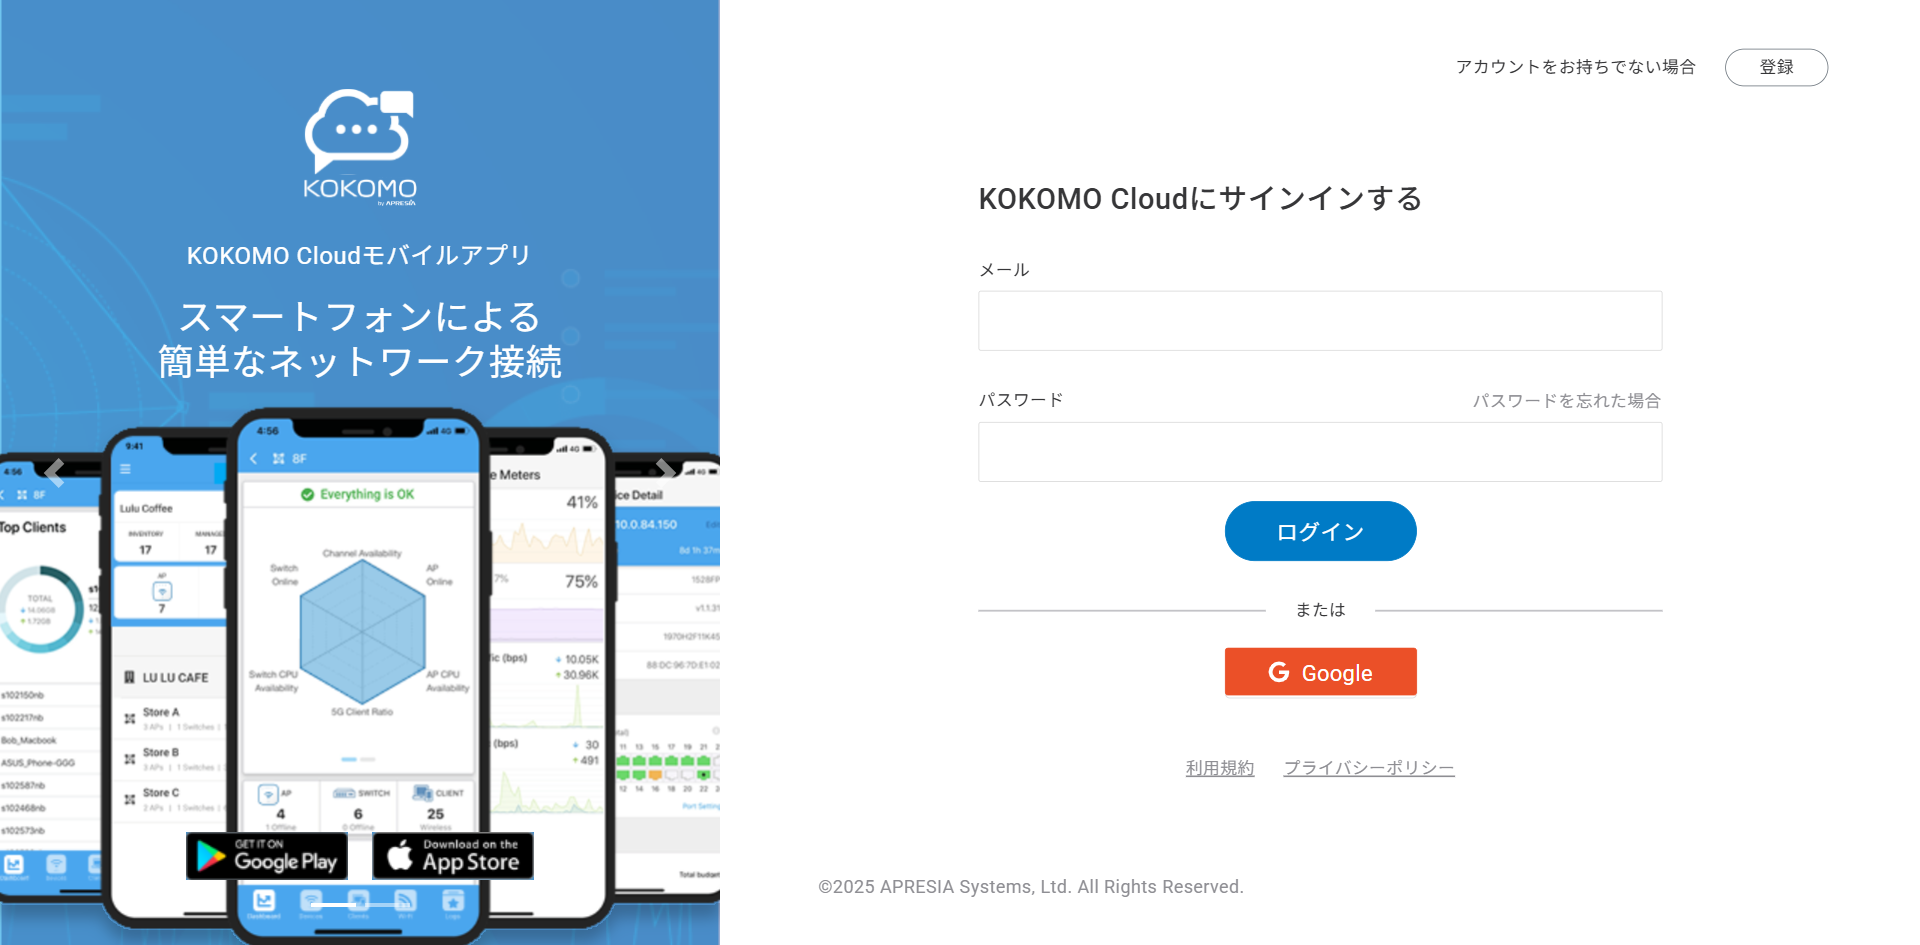
1. Webブラウザで <https://lan.kokomocloud.com/> を開きます。すると、メインのログインページが表示されます。

<figure><img src="/files/0W0md4fJdyMnkpGToUF9" alt=""><figcaption></figcaption></figure>

2. 登録したメールアドレスとパスワードを入力し「**ログイン**」ボタンをクリックします。
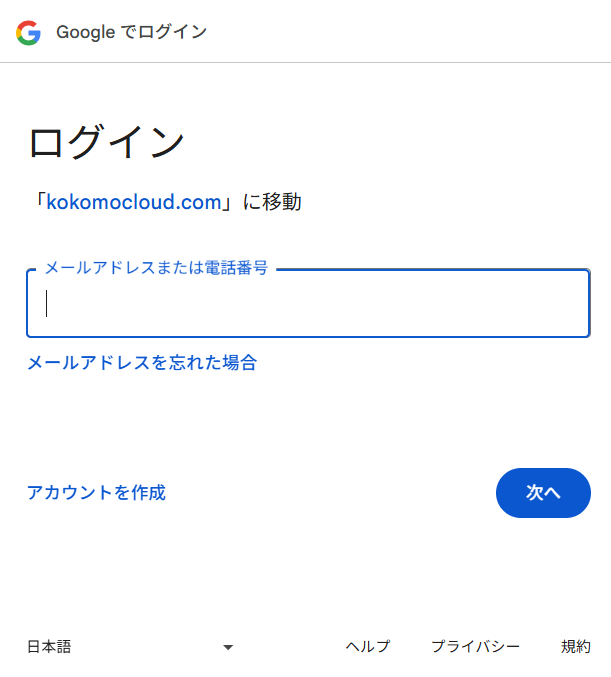
3. Googleアカウントユーザーは、「**Google**」ボタンをクリックして、Googleアカウントでログインすることもできます。

<figure><img src="/files/7IhpgSrL3WzvFXBgG9nl" alt="" width="306"><figcaption></figcaption></figure>

4. KOKOMO Cloudは、メールアドレスを一意のユーザーIDとして、新規アカウントごとにデフォルトの「**組織**」と「**ネットワーク**」を作成します。

{% hint style="info" %}
他の人から組織やネットワークに招待された場合は、このアカウントにはデフォルトの「**組織**」と「**ネットワーク**」は作成されません。KOKOMO Cloud上で複数のアカウントを作成した場合でも、同じメールアドレスであればアカウントは自動的に統合されます。たとえば、Googleアカウントと同じメールアドレスで新たにKOKOMO Cloudアカウントを作成した場合、Googleアカウントのパスワードを使ってGoogle認証でログインすることも、KOKOMO Cloudアカウント作成時のパスワードを使ってログインすることもできます。
{% endhint %}

{% hint style="info" %}
セッションタイムアウト時間は1時間です。1時間操作が行われなかった場合、自動的にセッション終了します。引き続き操作が必要な場合は改めてログインしてください。
{% endhint %}

{% hint style="info" %}
セッションタイムアウト時間を変更することはできません。
{% endhint %}

## 新規ユーザーの招待 <a href="#invitation" id="invitation"></a>

KOKOMO Cloudで管理・閲覧するユーザーを招待することができます。

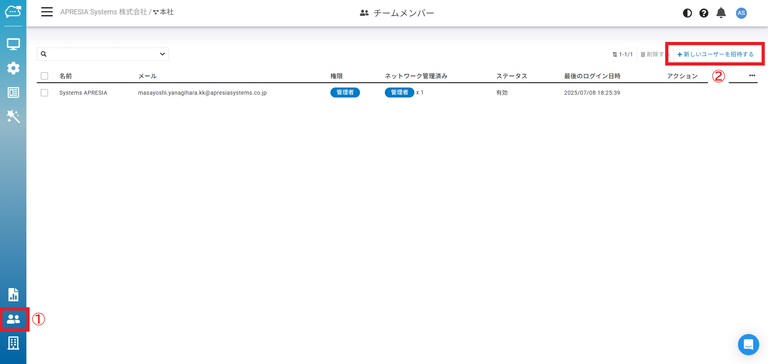
1. 「**チームメンバー**」＞「**新しいユーザーを招待する**」をクリックします。

<figure><img src="/files/kZAMkKBa1BrAGJOU1SAk" alt=""><figcaption></figcaption></figure>

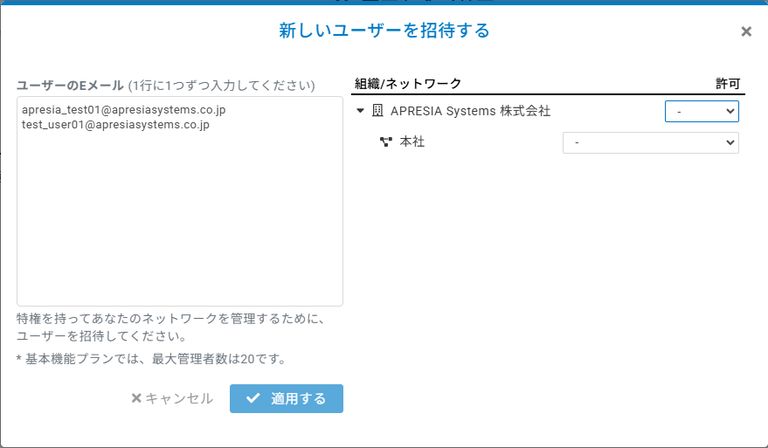
2. 「**新しいユーザーを招待する**」ダイアログから、招待するユーザーのEメールアドレスを入力し、組織/ネットワークのアクセス権限（閲覧者、管理者）をプルダウンメニューで選択します。

<figure><img src="/files/j9lm2TABIYgSkllkm1IT" alt="" width="563"><figcaption></figcaption></figure>

3. 「**適用する**」をクリックすると登録したEメールアドレスに対し招待メールが送信されます。

## ダッシュボードメニュー <a href="#dashboard-menu" id="dashboard-menu"></a>

ダッシュボード画面右上に表示される各メニューの説明です。

<figure><img src="/files/wd66n8xxxCZ3KLcTMiq8" alt=""><figcaption></figcaption></figure>

<figure><img src="/files/nyDbBaiqGOf2QQZg8RIj" alt="" width="563"><figcaption></figcaption></figure>

### モード切替 <a href="#mode-switch" id="mode-switch"></a>

GUI表示画面をライトモードとダークモードと切り替えます。

<div><figure><img src="/files/sX6Uf9ufP2Kohdtqteq5" alt=""><figcaption><p>ライトモード表示例</p></figcaption></figure> <figure><img src="/files/y6OZ8SNrZplEgNb3zzJD" alt=""><figcaption><p>ダークモード表示例</p></figcaption></figure></div>

### ヘルプメニュー <a href="#help-menu" id="help-menu"></a>

マークをクリックすると下記メニューが表示されます。

<figure><img src="/files/R7NA2UC9CZFM5B5YmRN4" alt="" width="206"><figcaption></figcaption></figure>

<table data-header-hidden><thead><tr><th width="231" valign="top"></th><th valign="top"></th></tr></thead><tbody><tr><td valign="top"><strong>ユーザーマニュアル</strong></td><td valign="top">本<a href="https://docs.lan.kokomocloud.com/">マニュアルサイト</a>が別ウィンドウで表示されます。</td></tr><tr><td valign="top"><strong>リリースノート</strong></td><td valign="top">KOKOMO Cloud製品の<a href="https://docs.lan.kokomocloud.com/release-note">リリースノート</a>が別ウィンドウで表示されます。</td></tr><tr><td valign="top"><strong>リモートサポート</strong></td><td valign="top">トラブルシューティングの際、KOKOMOサポート技術者がお客様のアカウントにアクセスできるようにするPASSCODEを生成します。詳細は「<a href="/pages/-LsOgU6YNhE_fVlU34Zl#remote-support-passcode">リモートサポートのパスコード</a>」を参照ください。</td></tr><tr><td valign="top"><strong>KOKOMOプロダクトサイト</strong></td><td valign="top">KOKOMO Cloud製品の<a href="https://kokomo.apresia.jp/">製品紹介ページ</a>が別ウィンドウで表示されます。</td></tr></tbody></table>

### 通知センター <a href="#notification-center" id="notification-center"></a>

自身が管理しているネットワーク全ての最近の通知が表示されます。詳細は「[通知センター](/notification-and-alerts/notification-center.md)」を参照ください。

### アカウント編集 <a href="#edit-account" id="edit-account"></a>

ログインアカウントのプロフィール編集やパスワード変更、アカウントの削除などが可能です。

<figure><img src="/files/mtSOEyvK1wppzuMQbyJy" alt="" width="315"><figcaption></figcaption></figure>

<table data-header-hidden data-search="false"><thead><tr><th width="207" valign="top"></th><th valign="top"></th></tr></thead><tbody><tr><td valign="top"><strong>プロフィールの編集</strong></td><td valign="top">アカウントの姓名・会社名を変更できます。</td></tr><tr><td valign="top"><strong>パスワード</strong></td><td valign="top">アカウントのパスワードを変更できます。</td></tr><tr><td valign="top"><strong>言語</strong></td><td valign="top">GUI画面の表示言語を英語・日本語で切替できます。</td></tr><tr><td valign="top"><strong>二要素認証 ※</strong></td><td valign="top">二要素認証（2FA）を有効化します。設定の詳細は「<a href="/pages/-M7p7RgL0huT0co0AOJR">二要素認証</a>」を参照ください。</td></tr><tr><td valign="top"><strong>ツアー</strong></td><td valign="top">GUI画面に表示されるアイコン・メニューなどの簡易ツアーガイドを表示します。</td></tr><tr><td valign="top"><strong>APIキー</strong></td><td valign="top"><a href="https://docs.lan.kokomocloud.com/unsupported-features/list/overall#api-key">未サポート</a>です。</td></tr><tr><td valign="top"><strong>通知設定</strong></td><td valign="top">自身が管理するネットワークの通知（モバイルアプリへの通知やメールへの通知）の有効・無効、および通知送信頻度を設定できます。詳細は「<a href="/pages/-LhBPTF4AT5CyPYx2Far">通知センター</a>」を参照ください。</td></tr><tr><td valign="top"><strong>アカウントを削除する ※</strong></td><td valign="top">ログインしているアカウントを削除します。</td></tr><tr><td valign="top"><strong>ログアウト</strong></td><td valign="top">GUI画面をログアウトします。</td></tr></tbody></table>

{% hint style="warning" %}
二要素認証を有効にしたら、万が一スマートフォンを紛失して二要素認証コードにアクセスできなくなった場合に備え、すぐにバックアップコードを作成してください。
{% endhint %}

{% hint style="danger" %}
アカウント削除の操作は元に戻せませんのでご注意ください。
{% endhint %}

### ダッシュボード表示形式切替 <a href="#switch-dashboard-display-format" id="switch-dashboard-display-format"></a>

ダッシュボードの表示形式を、通常バージョンと拡張バージョンで切替できます。詳細は「[デバイスの管理](/managing-devices.md)」を参照ください。


---

# Agent Instructions
This documentation is published with GitBook. GitBook is the documentation platform designed so that both humans and AI agents can read, navigate, and reason over technical content effectively. Learn more at gitbook.com.

## Querying This Documentation
If you need additional information that is not directly available in this page, you can query the documentation dynamically by asking a question.

Perform an HTTP GET request on the current page URL with the `ask` query parameter, and the optional `goal` query parameter:

```
GET https://docs.lan.kokomocloud.com/getting-started/logging-on.md?ask=<question>&goal=<endgoal>
```

`ask` is the immediate question: it should be specific, self-contained, and written in natural language.
`goal` is optional and describes the broader end goal you are ultimately trying to accomplish on behalf of the user. GitBook uses it to tailor the answer towards what is most useful for that goal.

The response will contain a direct answer to the question and relevant excerpts and sources from the documentation.

Use this mechanism when the answer is not explicitly present in the current page, you need clarification or additional context, or you want to retrieve related documentation sections.
